Grooming Your Pet English Cocker
|
|
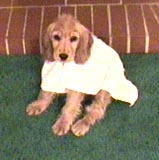
'Morgan' - O'Crowley
|
Grooming your pet
English Cocker yourself can be a lot of work, but it is much less
expensive than paying a groomer in the long run, and you will also
be assured that your dog is treated well during this sometimes
stressful process.
Please keep in mind that these instructions are for a pet
groom, for the average pet owner - NOT a show groom.
You should check with your breeder and find out if they are
particular about how the puppy is groomed, then follow their
advice.
|
|
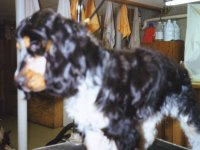
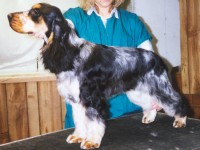
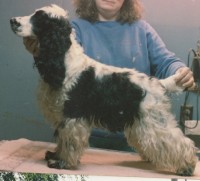
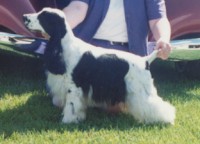
All of the dogs pictured on this page belong
to breeders, and are not shaved.
 |
|
If you have never groomed an English Cocker
before, it might be good to take your dog for its first haircut to
a professional groomer. That way you will have a pattern to
follow when you begin grooming yourself. Make sure you find
a groomer that knows how to do English Cockers, not American
Cockers, as they are groomed very differently. |
First off you will need
proper tools:
- A good set of clippers made for grooming dogs.
Oster clippers are what most ECS people I know
use. I use the Oster A5, it has 2 speeds that I find
come in handy. It comes with a #10 blade.
- Three Spacing Comb attachments for the Oster
clipper, 1/4", 1/2" and 1". Or a
4-F blade.
|
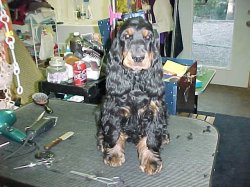
Grooming Table Set Up - Minor |
- A high quality pair of thinning scissors.
- A good pair of straight scissors, made for cutting dog
hair.
- Miscellaneous brushes/combs - a good pin brush, a small
slicker brush, a metal comb, a horse hair glove.
- A small snood, or a big soft hair scrunchy to hold the
ears up. Don't use rubber bands or coated rubber pony
tail loops - your dogs ears are very sensitive!
- A blow dryer - if you do not want to spend a couple
hundred dollars on a professional dog dryer, you can buy a
hand held doggie dryer called The Duck. It has 3 heat &
air settings. I would not recommend using
the highest heat setting, however.
- A grooming table or some area that you feel comfortable
grooming your dog.
- Some special treats that he really likes.
- Dog shampoo.
- A spray on leave-in coat conditioner.
- Towels.
- 2 Cotton Balls.
|
 |
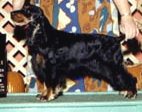 |
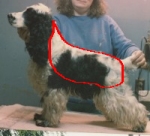
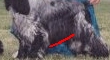
If your breeder does not want your dog shaved,
then you must strip the coat before bathing. A clean coat
is much harder to strip. Check with your breeder on this
process. |
| I know it's hard to
believe, but this is the same dog! 'Raven' - Minor |
|
|
|
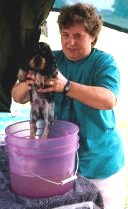
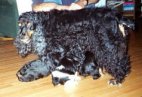
Paula & pup
Minor
|
OK, after
all your tools are in place the first thing you must do before any grooming
happens is bathe your dog in a good dog shampoo. Put a
cotton ball in each ear to avoid water getting in there. Rinse him
well, towel off excess moisture, and blow dry. Most people use some type of leave-in
coat conditioner to avoid mats and tangles. Use your metal
comb & pin brush during drying to separate the hair and speed
up the process. Try
not to groom your dog if he has not been bathed first - it will make your clippers and scissors dull.
Keep it lighthearted & fun - I usually give my dog
treats at intervals during the bath - one treat when I first put
them in the tub, then another one after I wet them down, then
another after getting soaped up, then another one when they're
rinsed off. Keep praise low key & calm.
|
|
|
|
So now your dog is clean, dry & all brushed out - where
do you start? Anywhere, really! Let's begin with
the back and work down. Place one of your combs on the end of your clipper - either
the 1" or the 1/2", depending on how short you like your
dogs coat on his back, or if you are using a 4-F blade instead,
put it on now. With the comb, shave against the grain of the
hair, starting at the tail and
continuing to the neck & making sure the hair that is falling off does not tangle in
with your dogs feathers (the long hair on his legs &
sides).
|
|
|
If you are using the blade instead of the comb, you
can shave with the direction of the hair to get a longer length if
desired. I use the combs because the blade gets very hot
during cutting, and with the comb on the hot blade never touches
your dogs skin. Another plus to the combs is they are very
lightweight, where the 4-F blade is heavier than the standard #10
blade. If you are having a problem controlling or gripping
the clipper the extra weight of the 4-F blade can compound your
difficulties.
Shave a small area, then put down your
clippers & turn them off (let them cool). Brush out the
area you have shaved, smooth it down with the horse hair brush, and see how you like it.
If it is too short or too long then change your comb before
proceeding. Clean the
hair off your table as you go along to prevent it from tangling in
with your dogs coat and causing a big mat. Give your dog
a treat - good dog! Keep your voice calm and your tone
down - nice calm praise.
Continue shaving the top coat. After you have finished this, let
your dog run around a little - take a small potty break!
Give him/her some treats - keep it fun.
|
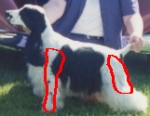 |
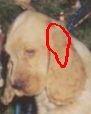
Now, back to business. Next we will shave the hind leg
area - you can use either the 1/4" or 1/2" comb, shave
against the growth of hair, begin right above what would be his knee joint,
and shave upward into the area you shaved the back coat off
of. You only shave the outside flank of the rear legs,
not the longer "feathers". See red area outlined
on picture.
|
Now, the front legs - shave from the foot upward, onto the
shoulders, and into the back coat area using the same comb or
blade you used on the back legs. You can use the soft
scrunchy or snood on his ears at this point to hold them up from
the area being groomed. Keep the scrunchy nice and
loose - don't hurt your dogs ears. Do not shave the back of
the legs.
If your dog is getting antsy, take another break, let your
clippers cool down, next we will start the head/ears.
|
| First put the ears up on top of the head in the
loose scunchy - you don't want to cut the hair on the ears by
mistake! Tilt the head back,
and shave with your #10 blade (no comb attached) from the neck area right up to the
lower jaw. Make sure you shave off the hair around the mouth
very close - it will keep the lips from getting infected by
holding moisture and food. Hook your finger in the lip and
pull it tight to get the blade close. Next shave the muzzle
itself, from just below the eye right to the lips. Again,
shave this area close. Take the scrunchy off the
ears. |
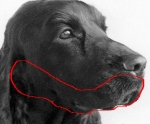
Shave close around the upper and lower lips, right back to the ear
opening.
|
Shave the inside of the ears, about 1/3 way down. Shave close all the hair around
the area where the ear attaches to the head, down to the mouth
area. Removing
this hair will open up the ears to air and hold down on
infections.
|
 |
On the outside of the ear, shave about 1/3 of
the way down into a 'v' shape. |
|
Put on your 1/4" spacing comb and shave the top of the
head.
If your dog has very thick hair you can thin out the long
feathers on all 4 legs with the thinning shears. Also use
the thinning shears along the sides to blend the clippered area in
with the skirt.
|
| Use your straight scissors to trim the skirt, longer toward
the front & tapering off to the back.
|
 |
|
Stand your dog and
trim close around the feet so they look like 'cat
feet'. Lay your dog down on his side and trim the hair
on the bottom of the feet even with the pads. Brush the feathers and skirt with
the slicker brush to fluff them out, and use the horse hair brush
on the areas you shaved to get a nice sleek look. Stand back and take a good look at
your grooming job. If any areas look choppy you can smooth
them out with the thinning shears. - Done! -
Remember, one good
thing about grooming your English Cocker is their hair grows
pretty quickly - so anything you cut too short won't stay that way
long! |
|
'Teddy' - Karsch before.
|
'Teddy' - Karsch after. |
|
|
|
|
Aedden 'before' - Land
|
Aedden 'after' - Land
|
|